Raspberry Pi Minecraft ISS Tracker

This post will show you how we built a Minecraft map of the world and then used some of our previous python code to track the International Space Station on that map. It was inspired by the fact that there are now two ‘Astro Pi‘ computers in space on the ISS.

Step one is finding a suitable map and converting it into something we can use. I used the ascii art generator at picascii.com to make a text file map of the world from an image of a cylindrical projection. You can get the text file here. Download the file and save it to a folder where you will have your python code.

If you don’t have Minecraft Pi edition already then you should install by running apt-get install minecraft-pi or grab it from the website. Also have a look at this page from the Raspberry Pi website which will give you an idea of what we are doing.

Start Minecraft on your Pi and select a new world [otherwise you will lose everything!] then change desktops and open a new file in IDLE which is the python development environment and run the code below. Note: the code is for python 2.

""" Make a Map in Minecraft"""
__author__ = '@damianmooney'
from mcpi import minecraft as minecraft
from mcpi import block as block
import random


def clearZone( alocx, alocz, blocx, blocz ):
    mc.setBlocks( alocx, 1, alocz, blocx, 128, blocz, block.AIR )
    mc.setBlocks( alocx, -5, alocz, blocx, 0, blocz, block.WATER )

if __name__ == "__main__":
    mc = minecraft.Minecraft.create()
    clearZone( -128, -128, 128, 128 )
    print('Cleared')
    f = open('world3.txt', 'r')  # open your ascii art text file
    mymap = f.read()
    f.close()

    myrows = mymap.split('\n')

    print mymap

    # --start our top corner of world adjust to get 0,0 ok on map
    x = 100
    z = 85

    for i in myrows: #for each line in our map
        #print len(i)
        print i
        z -=1
        x = 100
        y = 0
        for j in i:  # go through each position on the current line
            x -=1
            if j != " ":  # if the map is not empty blank minecraft then place a grass block 
                position = (x, y, z)
                mc.setBlock(position, block.AIR)
                mc.setBlock(position, block.GRASS)
            elif j != " ":  # place water
                position = (x, y, z)
                mc.setBlock(position, block.AIR )
                mc.setBlock(position, block.WATER )


This code blanks the whole map, reads in our ascii art text file and then goes through each line and puts either a grass block or a water block depending on the value in that position in the text file. You can use this technique to build all sorts of things.

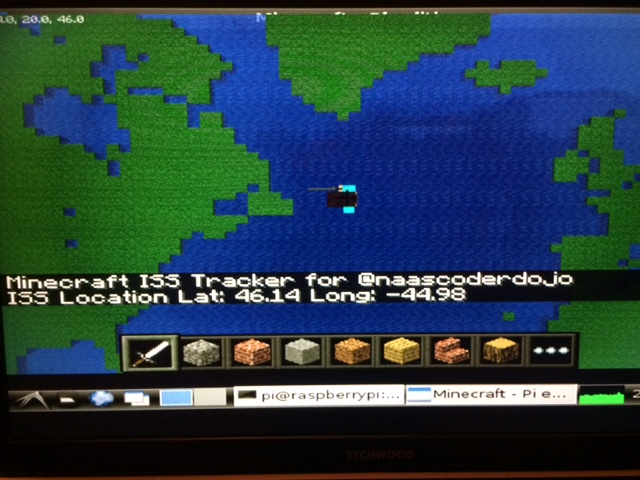
Hopefully you should end up with something like this.

Next we need to get the current position of the ISS so we will use the code from our previous posts. The api we are using has changed to the one by Bill Shupp and his site is here.

Now we will grab the position of the ISS and convert it to match our map dimensions. We can then update once a minute to see how things work. As we are using web based data your Pi will need an internet connection.

""" Get current ISS position from http://wheretheiss.at/ and map it on
    a raspberry pi with minecraft
"""
__author__ = '@damianmooney'
from mcpi import minecraft as minecraft
from mcpi import block as block
from datetime import datetime
import time
import urllib2
import json


def getiss():
    """ call where the iss at api thanks to Bill Shupp"""
    response = urllib2.urlopen('https://api.wheretheiss.at/v1/satellites/25544')
    mydata = response.read()
    return mydata


def do_coord(longitude):
    """ longitude: convert our longitude to a minecraft co-ordinate"""
    mine_long = longitude * -.55
    return mine_long


if __name__ == "__main__":
    mc = minecraft.Minecraft.create()
    mc.postToChat("   Minecraft ISS Tracker for @naascoderdojo")
    mc.camera.setFollow()
    mc.player.setting("autojump", False)
    mc.player.setPos(6, 20, 50)
    while True:
        iss = getiss()
        pos = json.loads(iss)
        lat = pos['latitude']
        lon = pos['longitude']

        mc.postToChat('   ISS Location Lat: %.2f Long: %.2f' % (lat,lon))
        new_long = do_coord(lon)
        mc.player.setPos(int(new_long),  20, int(lat))
        print('lon %d lat %d' % (new_long, lat))
        time.sleep(60)  # --only update once per minute - don't be greedy with api

You need to have your minecraft map running first, then switch to a second desktop on your pi and open a command window. Run the python code above and switch back to your first desktop.

Hopefully you should no see something like the image below. Double tap the space bar so your avatar hovers.

Raspberry Pi Minecraft ISS tracker

Raspberry Pi Minecraft ISS tracker

The code itself is pretty simple, we read in the json from the api, extract the latitude and longitude and then convert that to x, y, and z values in our minecraft world. The map itself is rough and ready but it is made out of blocks.

Raspberry PI, Python, Scratch and Minecraft

We were recently lucky enough to win 5 Raspberry PIs from the Coderdojo Foundation so figuring out what to do with them was our first challenge. In this post I will detail how I set them up so that the ninjas at the Naas-Sallins dojo could use them to improve their coding skills. They came with Raspbian installed but instructions for getting started with the PI are on the website. Knowing that the ninjas love minecraft I decided to install the special edition for the PI by following the instructions here.

Typically people use python to control the Pi edition of minecraft via its api and there is some great information on how to do that on the Stuff About Code website but after some digging about I found that it would be possible to use the Scratch extension mechanism to allow ninjas access minecraft on a remote Pi from their laptops.

The comprehensive instructions are here and you should have a read of them but in general you run a python program which talks http with scratch and translates them to instructions that the remote Pi running minecraft will understand. You then load a .s2e file which adds the minecraft blocks to scratch.

So once we got everything working with the mcpi-scratch extension it was time to see how well it works.

Using Scratch with the mcpi-scratch extension.

Using Scratch with the mcpi-scratch extension.

This screen shot shows the minecraft blocks which are found in the more blocks section and it also shows a couple of the custom blocks that are going to draw the letter they are named after in minecraft blocks.

When we run this scratch program with our mcpi-scratch helper application and extension running we get the following result.

This just gives a quick idea of what is possible, but the main advantage is that we can have multiple ninjas working on different laptops connecting to a single Pi running minecraft.

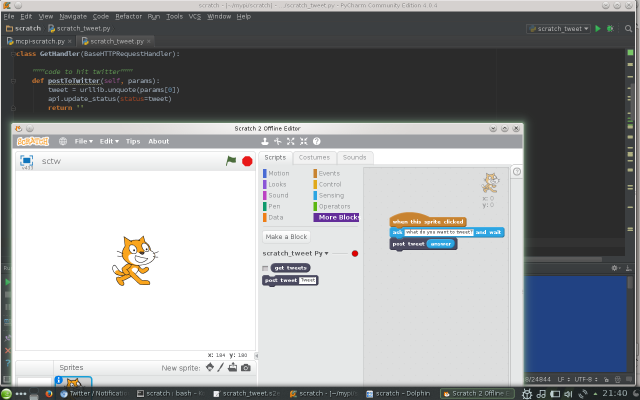
This ability to write helper apps and extensions for scratch open up a wide range of possibilities. I used the mcpi-scratch.py code as the basis for a quick test to allow scratch to tweet. I added the code from our earlier python program which uses the tweepy library.

""" messing about with Scratch2 helper app for twitter thanks to mcpi-scratch for the idea"""
import sys, traceback
import argparse, urllib
from BaseHTTPServer import BaseHTTPRequestHandler
import urlparse
import tweepy
import logging

logging.basicConfig(level=logging.DEBUG)
log = logging.getLogger(__name__)

class GetHandler(BaseHTTPRequestHandler):

    """code to hit twitter"""
    def postToTwitter(self, params):
        tweet = urllib.unquote(params[0])
        api.update_status(status=tweet)
        return ''

    def pollEvents(self, params):
        global pollInc, pollLimit, prevPosStr, posStr
        pollInc += 1
        log.debug('poll: {} {}'.format(pollInc, prevPosStr))
        if (prevPosStr != "") and (pollInc % pollLimit != 0):
            log.debug("don't call mc")
            return prevPosStr

        posStr = ''
        prevPosStr = posStr
        return posStr

    def do_GET(self):
        global api
        cmds = {
            "poll" : self.pollEvents,
            "postToTwitter" : self.postToTwitter,
        }
        parsed_path = urlparse.urlparse(self.path)

        message_parts = []
        message_parts.append('')
        cmdpath = parsed_path[2].split('/')
        print cmdpath
        handler = cmds[cmdpath[1]]
        pollResp = handler(cmdpath[2:])
        log.debug ("pollResp: {0}".format(pollResp))
        message_parts.append(pollResp)
        message = '\r\n'.join(message_parts)
        self.send_response(200)
        self.end_headers()
        self.wfile.write(message)
        return

parser = argparse.ArgumentParser(description='scratch_tweet is a Scratch2 extension helper app to allow Scratch programs to manipulate twitter via tweepy')

#enter the corresponding information for your Twitter application:
CONSUMER_KEY = 'sjkfhskjhfkjshfkjdsh'
CONSUMER_SECRET = 'fkslfjskljfklsjflkjsdldfkjslkfjlksjfkls'
ACCESS_KEY = 'sjdfklsjfkljsklfjlskjfklsjfklsjlfkjslkfjskljfkls'
ACCESS_SECRET = 'skfljslkfjskljfklsjflkjslkfjskljflksjflksjfklj'

auth = tweepy.OAuthHandler(CONSUMER_KEY, CONSUMER_SECRET)
auth.set_access_token(ACCESS_KEY, ACCESS_SECRET)

args = parser.parse_args()
log.info(args)

pollInc = 0
pollLimit = 15
prevPosStr = ""

try:
    api = tweepy.API(auth)
except:
    e = sys.exc_info()[0]
    log.exception('cannot connect to twitter')
    traceback.print_exc(file=sys.stdout)
    sys.exit(0)

from BaseHTTPServer import HTTPServer
server = HTTPServer(('localhost', 4715), GetHandler)
log.info('Starting server, use <Ctrl-C> to stop')
server.serve_forever()</pre>
<pre>

The scratch extension associated with this program is as follows this should be saved as a .s2e file

{
 "extensionName": "scratch_tweet Py",
 "extensionPort": 4715,
 "blockSpecs": [

 [" ", "post tweet %s", "postToTwitter", "Tweet"],
 ],

 }
 }

So now you run the python program, launch scratch, hold down shift and click file and then pick import experimental http extension and open the extension above. The post tweet block should now be available to use.
scratchtweet

scratchtweetxx
This just shows what is possible with the http extension in scratch.

Make Music with Code using EarSketch

This post for the Naas-Sallins CoderDojo is about making music by writing code using Earsketch. There are lots of fantastic instructions on the website including a section for teachers. I strongly suggest that you have a look at the documentation but sometimes it’s fun just to jump straight in and see what we can make.

Earsketch Online supports Chrome, Firefox and Safari so using one of those browsers lets get started by clicking here.

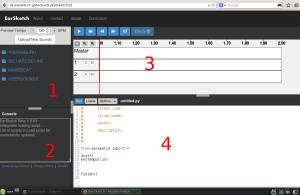
The Earsketch window has 4 main areas and looks like this.

EarSketch

They are

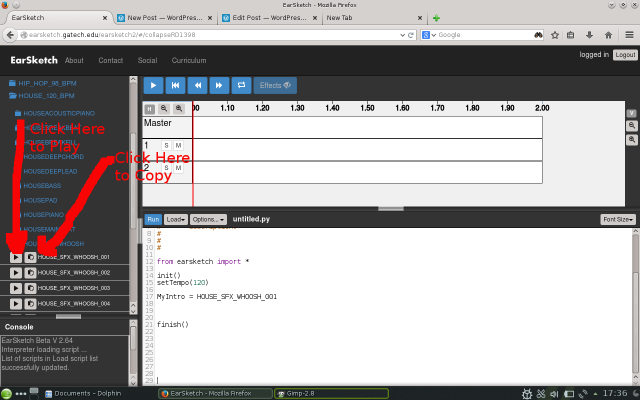
  1. Sound selection: Here you can sample the different sounds available for making music. Expand each list and click on a play icon to hear what it sounds like.
  2. Message Console: Error messages and other information is displayed here.
  3. Sound Window: A graphical representation of your music is shown in this area.
  4. Code Window: This is where you type your python (or javascript) code.

So lets jump in and make some Noise!

Lets start with an intro, in the code window after setTempo(120) type

MyIntro =

then go to the sound selection area and expand by clicking RICHARDDEVINE – HOUSE_120_BPM – HOUSEFXWHOOSH click on the play icon to hear the sound and click on the clipboard icon to copy this sounds name into your code

EarSketch1

It is a good idea to define each sound type that you intend to use at the top of your code so that if you change your mind about it you only have to change your code in one place.

Now that we have defined our intro lets figure out how to play it.

We can do this by using the fitMedia command. This takes the form

fitMedia(sound, track, start playing, stop playing) The start and stop time are defined in measures. A measure of music is a block of time defined by a specified number of beats. In the EarSketch environment, a measure is always defined by four beats.

In our case we want or code to be


from earsketch import * 

init()
setTempo(120) 

MyIntro = HOUSE_SFX_WHOOSH_001

fitMedia(MyIntro, 0, 1, 3)

finish()

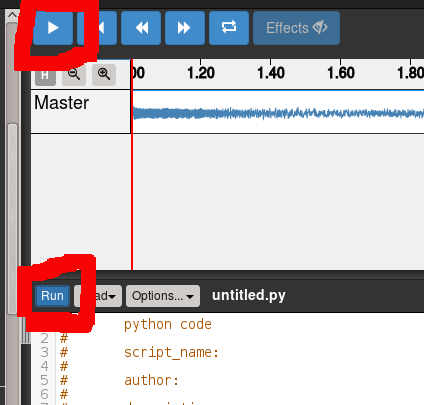
To see if this works click on the run button and if everything goes ok click on the play button in the sound window. Any errors will be shown in the console.

EarSketch2

Now we can build up a piece of music using the same steps as above. Lets define our main beat as MyBeat = HOUSE_MAIN_BEAT_008 so our code is now


from earsketch import *

init()
setTempo(120)

MyIntro = HOUSE_SFX_WHOOSH_001
MyBeat = HOUSE_MAIN_BEAT_008

fitMedia(MyIntro, 0, 1, 3)
fitMedia(MyBeat, 0, 3, 25)

finish()

When we run this code we can see that the sound window expands to show our longer tune because our beat starts at 3 when the intro ends, and finishes on measure 25. If we want more then one sound to be played at a time we need to use a different ‘track’. For example if we add some bass and set it to use track 1 rather than 0 with our fit media command


from earsketch import *

init()
setTempo(120)

MyIntro = HOUSE_SFX_WHOOSH_001
MyBeat = HOUSE_MAIN_BEAT_008
MyBass = HOUSE_DEEP_BASS_001

fitMedia(MyIntro, 0, 1, 3)
fitMedia(MyBeat, 0, 3, 25)
fitMedia(MyBass, 1, 2.5, 25)

finish()

We can see that when we press run we get a second track shown in the sound window

EarSketch3

Next we are going to add a lead, but we are going to use two different sounds. It’s fun messing around to see what fits together but in this case I have changed the code to define MyLead_1 & MyLead_2. You can see from our fitMedia commands that I switch to MyLead_2 for 10 measures and switch back at measure 17 and we run this on track 2.


from earsketch import * 

init()
setTempo(120) 

MyIntro = HOUSE_SFX_WHOOSH_001
MyBeat = HOUSE_MAIN_BEAT_008
MyBass = HOUSE_DEEP_BASS_001
MyLead_1 = HOUSE_DEEP_ARPLEAD_001
MyLead_2 = HOUSE_DEEP_CRYSTALCHORD_001

fitMedia(MyIntro, 0, 1, 3)
fitMedia(MyBeat, 0, 3, 25)
fitMedia(MyBass, 1, 2.5, 25)
fitMedia(MyLead_1, 2, 3, 10)
fitMedia(MyLead_2, 2, 10, 17)
fitMedia(MyLead_1, 2, 17, 25)

finish()

Next I want add a custom user sound. You can record your own voice, or like me you can use a text 2 voice service. The audio needs to be in wav format so you may need to convert it using an online media converter or a windows program like this. You will need to be logged in to Earsketch to upload your file, when you are click on upload new sounds at the top of the sound selection window and enter the details into the dialog box. In this case I decided to use my coderdojo sound with the makeBeat command. There are plenty of details in the documents but to be honest I copied an example and then messed around with it. I use a for loop that goes from 11 to 16 in steps of 2 to play this sound at those points. The beat = “0++00-00-0+++0+0++++++” string controls how the sound is played.

The final code is as below


from earsketch import *

init()
setTempo(120)
MyIntro = HOUSE_SFX_WHOOSH_001
MyBeat = HOUSE_MAIN_BEAT_008
MyBass = HOUSE_DEEP_BASS_001
MyLead_1 = HOUSE_DEEP_ARPLEAD_001
MyLead_2 = HOUSE_DEEP_CRYSTALCHORD_001

MySound1 = DANGERMSE_CODER_DOJO_01
beat = "0++00-00-0+++0+0++++++"

# using iteration instead of repeating similar lines of code
for measure in range(11, 16, 2):
    makeBeat(MySound1, 3, measure, beat)

fitMedia(MyIntro, 0, 1, 3)
fitMedia(MyBeat, 0, 3, 25)
fitMedia(MyBass, 1, 2.5, 25)
fitMedia(MyLead_1, 2, 3, 10)
fitMedia(MyLead_2, 2, 10, 17)
fitMedia(MyLead_1, 2, 17, 25)

finish()

You can download an mp3 of your tune by selecting to do so from the options button above the code window.

The Tune for above is here


Finally I would again suggest that you should have a look at the Earsketch Website which really has great quality instructions.


Scratch (well almost) and the ISS

This is just a very short post for the Naas-Sallins Coder Dojo about a smaltalk clone of  Scratch called Phratch. As the website says “ It includes two interesting categories: Files and colors. Files allows one to manipulate local and remote files, and Colors to manipulate color features”. So in this quick post we are going to have a look at the files extension.

Phratch Files Section

Phratch Files Section

The first item here is the one we are going to use by pointing the url at the open-notify api from our previous posts. Our very short 8 line program is as follows

Phratch ISS Tracker Code

Phratch ISS Tracker Code

Inside a standard ‘When Green Flag is clicked-Forever loop’

we set the variable mydata to the contents of our api call

we set the variables lat and lon to a particular range of characters in my data. I did this by trial and error and its a bit rough and ready.

we then set x and y to the lat and lon adjusted to match the dimensions of the display window size (360×480) to standard latitude and longitude (180×360)

finally we sleep for a minute

The sprite to represent the ISS position is a simple blue dot with the stage background set to a map of the world. The map projection I used was from a python basemap example with a quick photoshop adjustment to crop it to size. The Equidistant Cylindrical Projection matches the requirements of our display window and our result turns out to be pretty decent

Real-Time ISS Tracker

Real-Time ISS Tracker

So as you can see the ability that phratch has to interact with a file or a url opens up a whole new set of interesting opportunities.

If you are interested you can download phratch here.

Python and The ISS Part 2

This is part two of a post for Naas-Sallins Coder Dojo about the International Space Station. We assume you have worked through part one and in particular have successfully installed the python libraries required. The install instructions for basemap and its dependencies are here and maybe here if you are on a Mac. Our intention is to use this library to plot the position of the ISS on a map using python. As the introduction to basemap says “the matplotlib basemap toolkit is a library for plotting 2D data on maps in Python.” It comes with a whole set of projections which are listed here. A projection is a way of representing the curved surface of the earth on a 2d map. If you click on any of the linked projections you will see the python code required to produce it and the map itself. The first thing we need to do is make sure that everything is installed ok, as is the tradition we will do this with a hello world program.

""" Hello World Check basemap is ok"""
from mpl_toolkits.basemap import Basemap
import numpy as np
import matplotlib.pyplot as plt
# lon_0, lat_0 are the center point of the projection.
# resolution = 'l' means use low resolution coastlines.
m = Basemap(projection='ortho',lon_0=-6,lat_0=53,resolution='l')
m.drawcoastlines()
m.fillcontinents(color='coral',lake_color='aqua')
# draw parallels and meridians.
m.drawparallels(np.arange(-90.,120.,30.))
m.drawmeridians(np.arange(0.,420.,60.))
m.drawmapboundary(fill_color='aqua')
plt.title("Hello")
plt.show()
Basemap

Hello World

This code is straight from the example for orthographic projections with the title changed to give us ‘Hello’ with the world underneath, and the latitude and longitude changed to center the map over Naas. Our next step is to find a way to plot a point on the map.

from mpl_toolkits.basemap import Basemap
import numpy as np
import matplotlib.pyplot as plt

# use example cassini projection from basemap website
map = Basemap(width=891185,height=1115557,resolution='i',projection='cass',lon_0=-4.36,lat_0=54.7)
map.drawcoastlines()
map.fillcontinents(color='coral',lake_color='aqua')
# draw parallels and meridians.
map.drawparallels(np.arange(-40,61.,2.))
map.drawmeridians(np.arange(-20.,21.,2.))
map.drawmapboundary(fill_color='aqua')
plt.title("We are Here")
x,y = map(-6.67, 53.22)
map.plot(x, y, 'bo', markersize=12)
plt.show()

So using the example cassini projection we added x,y = map(-6.67, 53.22) map.plot(x, y, ‘bo’, markersize=12) which sets the coordinates for the point we want to plot and then plots it on a map as a blue circle sized 12. This gives us

plot Naas

Plot our position

Now that we can plot a point, we want to use our code from before to get the current position of the ISS so that we have something like

""" plot the ISS"""
import numpy as np
from mpl_toolkits.basemap import Basemap
import matplotlib.pyplot as plt
from datetime import datetime
import urllib2
import json

def getiss():
    """ call opennotify api"""
    response = urllib2.urlopen('http://api.open-notify.org/iss-now.json')
    mydata = response.read()
    return(mydata)

iss = getiss()
pos = json.loads(iss)
lat = pos['iss_position']['latitude']
lon = pos['iss_position']['longitude']

# miller projection
map = Basemap(projection='mill',lon_0=0)
# plot coastlines, draw label meridians and parallels.
map.drawcoastlines()
map.drawparallels(np.arange(-90,90,30),labels=[1,0,0,0])
map.drawmeridians(np.arange(map.lonmin,map.lonmax+30,60),labels=[0,0,0,1])
# fill continents 'coral' (with zorder=0), color wet areas 'aqua'
map.drawmapboundary(fill_color='aqua')
map.fillcontinents(color='coral',lake_color='aqua')
x,y = map(lon, lat)
map.plot(x, y, 'bo', markersize=12)
plt.show()

So this time we are using the json values returned by our getiss() function to plot the point on the map. At this stage we have an application which can draw the current position of the ISS on a map of the world which shows the power of the available python libraries. All that remains is to add some bells and whistles to our map and get it to update the position of the ISS. The code for this is below and it is mainly taken from the examples on the basemap website. We can discuss all this and play around with the various map projection options at the next few dojo sessions.

""" plot the ISS and update every 60 seconds"""
import numpy as np
from mpl_toolkits.basemap import Basemap
import matplotlib.pyplot as plt
from datetime import datetime
import time
import urllib2
import json

def getiss():
    """ call opennotify api"""
    response = urllib2.urlopen('http://api.open-notify.org/iss-now.json')
    mydata = response.read()
    return(mydata)

while True:
    iss = getiss()
    pos = json.loads(iss)
    lat = pos['iss_position']['latitude']
    lon = pos['iss_position']['longitude']

    # miller projection
    map = Basemap(projection='mill',lon_0=0)
    # plot coastlines, draw label meridians and parallels.
    map.drawcoastlines()
    map.drawparallels(np.arange(-90,90,30),labels=[1,0,0,0])
    map.drawmeridians(np.arange(map.lonmin,map.lonmax+30,60),labels=[0,0,0,1])
    # fill continents 'coral' (with zorder=0), color wet areas 'aqua'
    map.drawmapboundary(fill_color='aqua')
    map.fillcontinents(color='coral',lake_color='aqua')
    # shade the night areas, with alpha transparency so the
    # map shows through. Use current time in UTC.
    date = datetime.now()
    CS=map.nightshade(date)
    plt.title('ISS Location For for %s Lat: %.2f Long: %.2f' % (date.strftime("%d %b %Y %H:%M:%S"),lat,lon))

    x,y = map(lon, lat)
    map.plot(x, y, 'bo', markersize=12)
    plt.ion()
    plt.draw()
    plt.show(block=False)
    time.sleep(60) # --only update once per minute - dont be greedy with api
    plt.clf()

This code gives us a real time ISS tracker showing a map of the world with day/night shown that updates every minute.

ISS Tracker

ISS-Tracker in Python

To stop the app hit crtl-c in the command window where you started the application.

If the ISS is over land and it is daytime then you can have a look at a video stream of what it can see here.

Python and The ISS

In this post for Naas-Sallins Coder Dojo we are going to pick up where we left off last time but instead of getting the weather we are going to get some details about the International Space Station. Again we are going to use a free publically available web api as the source of our information, in this case we are going to use Open-Notify for our data. There are two main pieces of data available about the ISS which are its current position and the time and date of the next few overhead passes for a given location. So quickly adapting our code from our weather app last time out we get the following

""" read opennotify api"""
import urllib2
import json
import datetime

def getiss():
    """ call opennotify api"""
    response = urllib2.urlopen('http://api.open-notify.org/iss-pass.json?lat=53.22&lon=-6.67')
    mydata = response.read()
    return(mydata)

def main():
    iss = getiss()
    pos = json.loads(iss)
    passtimes = []

    for i in pos['response']:
        when =  i['risetime']
        passtimes.append(datetime.datetime.fromtimestamp(int(when)).strftime('%Y-%m-%d %H:%M:%S'))
    print passtimes

if __name__ == '__main__':
    main()

We have put the latitude and longtitude for Naas in to the api call and used the techniques from the last time to extract the relevant bits from the data returned which looks something like

{
“request”: {
“datetime”: 1399717598,
“latitude”: 53.22,
“altitude”: 100,
“passes”: 5,
“longitude”: -6.67
},
“response”: [
{
“duration”: 642,
“risetime”: 1399719911
},
{
“duration”: 605,
“risetime”: 1399725716
},
Again we parse this JSON data like the last time to extract each occurance of risetime which we add to a list called passtimes. The api documentation tells us that risetime is the time that the ISS will start passing by the location given in unix time format. A quick web search tells us how python can convert that into a more normal looking date and time by using the datetime library. If we print out our passtimes list we get the following output

[‘2014-05-10 12:05:11’, ‘2014-05-10 13:41:56’, ‘2014-05-10 15:19:22’, ‘2014-05-11 06:31:32’, ‘2014-05-11 08:04:31’]

If we want to tweet this information from our twitter account for the dojo @NaasCoderDojo then its a simple matter of putting this together with our weather twitter-bot from the last time


""" Python ISS for @NaasCoderDojo using tweepy and open-notify.org """
import tweepy
import urllib2
import json
import datetime

#codes below are fake: enter details from your Twitter application
CONSUMER_KEY = 'asdadjakljdakljdakljdlklm'
CONSUMER_SECRET = 'dkjahdkhakdhakjdhkajhdkjahdkjahdkahdkhakdhajhdajbi'
ACCESS_KEY = 'ajsdhakhdkajhdkjahdkjahdkjhakjdhakjdhkajhdkajhdakh'
ACCESS_SECRET = 'djaghdhakhfkahfkjahfkjahfkhakfjhakjfhakfhkfah'

def getiss():
    """ call opennotify api"""
    response = urllib2.urlopen('http://api.open-notify.org/iss-pass.json?lat=53.22&lon=-6.67')
    mydata = response.read()
    return(mydata)

auth = tweepy.OAuthHandler(CONSUMER_KEY, CONSUMER_SECRET)
auth.set_access_token(ACCESS_KEY, ACCESS_SECRET)
api = tweepy.API(auth)

iss = getiss()
#print iss
pos = json.loads(iss)
passtimes = []

for i in pos['response']:
    when =  i['risetime']
    passtimes.append(datetime.datetime.fromtimestamp(int(when)).strftime('%Y-%m-%d %H:%M:%S'))

tweet = "#coderdojo #python ISS is over Naas at " + ",".join(passtimes)
print tweet
api.update_status(tweet)

The second open-notify api call gives us the current location of the ISS and we can print use this by following our same technique of calling the api, printing out all the data returned and then picking the bits out of the JSON data that we want. The code for getting the current location would be

""" Get current ISS position from open-notify.org"""
from datetime import datetime
import time
import urllib2
import json

def getiss():
    """ call opennotify api"""
    response = urllib2.urlopen('http://api.open-notify.org/iss-now.json')
    mydata = response.read()
    return(mydata)

iss = getiss()
pos = json.loads(iss)
lat = pos['iss_position']['latitude']
lon = pos['iss_position']['longitude']
when = datetime.now()
print('ISS Location For for %s Lat: %.2f Long: %.2f' % (when.strftime("%d %b %Y %H:%M:%S"),lat,lon))

This should give us something like
ISS Location For for 10 May 2014 11:58:23 Lat: 51.62 Long: -17.66

If you want to see what the ISS can see take a look at this link which is an actual case of Hello World! If you dont see anything then read the text which will explain why.

There will be second part to this ISS post which requires the installation of some python libraries so it would help if we can try to follow the instructions here and maybe here if you are on a Mac. The plan is to build an application which plots the current position of the ISS and displays it on a map. As usual we can have a look at any problems at the next dojo session.

Edit: depending on your python set-up you may also need to install pyparsing and python_dateutil packages. From a command window try

easy_install pyparsing

easy_install python_dateutil


Python Twitter Bot

This is just a quick write up on the python weather twitter-bot we put together this week at the Naas-Sallins Coder Dojo. For this task we needed three things, a source for the weather data, a twitter account and a twitter api library for python.

We created a twitter account for the dojo @NaasCoderDojo and then followed the instructions here to register an application. We did this ahead of the session because it can take a couple of days. In order to write tweets you need to register your application for read-write and you need a mobile phone to complete the process. Once you get your application registered you will need the api token and secret as well as the access key and secret for your python application. You need not to share this information otherwise anyone can tweet as you.


Once you have these four bits of information you need a python twitter library to get started. We chose Tweepy. To install you can choose a number of methods. From a command window/terminal type

easy_install tweepy

or grab the zip file from github, unzip and then in the command window in the folder you put the files in type

python setup.py install

Once we have tweepy installed we need to check that our setting are working so we wrote a quick program to print out our tweets.

""" Program to Read tweets"""
import tweepy

#enter the corresponding information for your Twitter application:
CONSUMER_KEY = 'abc123 put your api consumer key here'
CONSUMER_SECRET = 'abc123 put you api consumer secret code here'
ACCESS_KEY = 'xyz123 put access token here'
ACCESS_SECRET = 'xyz123 put your access token secret here'

auth = tweepy.OAuthHandler(CONSUMER_KEY, CONSUMER_SECRET)
auth.set_access_token(ACCESS_KEY, ACCESS_SECRET)
api =tweepy.API(auth)
#---now we can connect to twitter
for tweet in api.user_timeline():
    print(tweet.text)

This code imports the tweepy library, defines the variables needed (you need to place the ones you got on apps.twitter.com here) and then sets us up to connect to twitter. We based this code on the getting started examples in the tweepy documentation. The last two lines loop through our tweets and prints them out. If we wanted to send a tweet then we just need to change these last two lines to something like

tweet = "Hello World. Test Tweet using Tweepy and Python"
api.update_status(tweet)

The next step was to find source of weather data. We chose openweathermap.org as they offer free weather data to everyone. Their api page has some examples on how to get the weather data and we decided to use the JSON one. Python has a number of ways of interaction with the web and we picked one of the most commonly used ones, urllib2. Our initial code to get the data was as follows.

import urllib2

def getweather():
    """ call openweathermap api"""
    response = urllib2.urlopen('http://api.openweathermap.org/data/2.5/weather?q=Naas')
    mydata = response.read()
    return mydata 

weather = getweather()
print weather

This code imports urllib2 and then defines our function to get the weather called getweather. Here we set response equal to our call to the open weather api (setting the town to Naas) and then say that the variable mydata will be equal to a read of that url. We return this variable and then print it. which gives something like

{“coord”:{“lon”:-6.67,”lat”:53.22},”sys”:{“message”:0.0042,”country”:”IE”,”sunrise”:1398057151,”sunset”:1398109082},”weather”:[{“id”:800,”main”:”Clear”,”description”:”Sky is Clear”,”icon”:”01d”}],”base”:”cmc stations”,”main”:{“temp”:286.29,”humidity”:81,”pressure”:1007,”temp_min”:286.15,”temp_max”:286.48},”wind”:{“speed”:4.63,”gust”:7.71,”deg”:82},”rain”:{“3h”:0},”clouds”:{“all”:0},”dt”:1398076686,”id”:2962334,”name”:”Naas”,”cod”:200}

This is our weather data in JSON format and even by looking at this you can see that elements such as wind speed and temp are present. To put this data in a tweet we need to parse the JSON data to extract the we want so we imported the python json library and started playing around with print statements to see what data we could extract

""" get the weather for Naas from openweathermap """
import urllib2
import json
def getweather():
    """ call openweathermap api"""
    response = urllib2.urlopen('http://api.openweathermap.org/data/2.5/weather?q=Naas')
    mydata = response.read()
    return mydata

weather = getweather()
w = json.loads(weather)
print w['wind']['speed']
print w['main']['temp']

So the way that this JSON is structured is that there is a series of sections followed by some names and associated values. In our code above we set w to the result of using the json.loads method on our weather data. We can then extract individual parts of the data by referring to them by their name in the manner shown. Our next step was to compose our tweet which we did by building up a list of the bits we wanted and some words as appropriate.

""" get the weather for Naas from openweathermap """
import urllib2
import json
def getweather():
    """ call openweathermap api"""
    response = urllib2.urlopen('http://api.openweathermap.org/data/2.5/weather?q=Naas')
    mydata = response.read()
    return mydata

weather = getweather()
w = json.loads(weather)
temp = -273 + int(w['main']['temp']) #--since temp is in kelvin
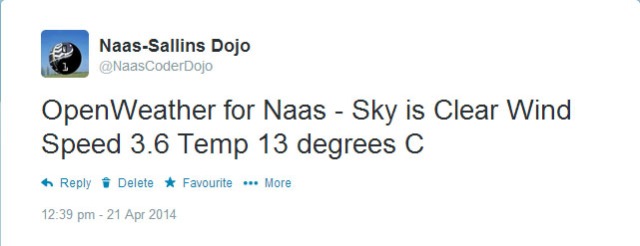
mylist = ['OpenWeather for', w['name'],'-',w['weather'][0]['description'],'Wind Speed',str(w['wind']['speed']),'Temp',str(temp),'degrees C']
outstring = " ".join(mylist)
print outstring

You will also notice that we had to adjust for the fact that the temp is in Kelvin to get degrees celsius.
At this stage all we had to do was put the two chunks of code together to have our python weather twitter bot.

""" Python Weather Twitter-Bot for @NaasCoderDojo using tweepy and openweathermap """
import tweepy
import urllib2
import json

#codes below are fake: enter details from your Twitter application
CONSUMER_KEY = 'asdadjakljdakljdakljdlklm'
CONSUMER_SECRET = 'dkjahdkhakdhakjdhkajhdkjahdkjahdkahdkhakdhajhdajbi'
ACCESS_KEY = 'ajsdhakhdkajhdkjahdkjahdkjhakjdhakjdhkajhdkajhdakh'
ACCESS_SECRET = 'djaghdhakhfkahfkjahfkjahfkhakfjhakjfhakfhkfah'

def getweather():
    """ call openweathermap api"""
    response = urllib2.urlopen('http://api.openweathermap.org/data/2.5/weather?q=Naas')
    mydata = response.read()
    return mydata

auth = tweepy.OAuthHandler(CONSUMER_KEY, CONSUMER_SECRET)
auth.set_access_token(ACCESS_KEY, ACCESS_SECRET)
api = tweepy.API(auth)

weather = getweather()
w = json.loads(weather)
temp = -273 + int(w['main']['temp']) #--since temp is in kelvin
mylist = ['OpenWeather for', w['name'],'-',w['weather'][0]['description'],'Wind Speed',str(w['wind']['speed']),'Temp',str(temp),'degrees C']
tweet = " ".join(mylist)

api.update_status(tweet)

Our Tweet

@NaasCoderDojo

Our aim here was to show the guys how they could put together some web technologies by using the examples provided by tweepy and openweathermap and adjusting them to their own needs. We hope to amend our code to take advantage of other freely available data such as International Space Station location in the next session. Hopefully you can follow the results on @NaasCoderDojo

edit: just noticed some formatting issues with code on iphone etc. looks fine on chrome/IE/Firefox will investigate

A-maze-in Python

In this post  for the Naas-Sallins Coder Dojo we are going to look at writing a program which will draw a maze. We will then use that code as a map to allow us to build a maze in our minecraft-clone world. So code for a maze is tricky but luckly for us someone has already written some.

The Rosetta Code website is really cool and it attempts to show solutions to common problems in as many different computer programming languages as possible.

from random import shuffle, randrange

def make_maze(w = 16, h = 8):
	vis = [[0] * w + [1] for _ in range(h)] + [[1] * (w + 1)]
	ver = [["|  "] * w + ['|'] for _ in range(h)] + [[]]
	hor = [["+--"] * w + ['+'] for _ in range(h + 1)]

	def walk(x, y):
		vis[y][x] = 1

		d = [(x - 1, y), (x, y + 1), (x + 1, y), (x, y - 1)]
		shuffle(d)
		for (xx, yy) in d:
			if vis[yy][xx]: continue
			if xx == x: hor[max(y, yy)][x] = "+  "
			if yy == y: ver[y][max(x, xx)] = "   "
			walk(xx, yy)

	walk(randrange(w), randrange(h))
	for (a, b) in zip(hor, ver):
		print(''.join(a + ['\n'] + b))

make_maze()

So as you can see its pretty complicated but if we run this piece of code we should get something like

+--+--+--+--+--+--+--+--+--+--+--+--+--+--+--+--+
|        |     |     |                    |     |
+  +  +  +  +  +  +  +  +--+--+--+--+--+  +--+  +
|  |  |     |  |  |     |     |        |        |
+--+  +--+--+  +  +--+--+--+  +  +--+  +--+--+  +
|     |     |  |  |  |        |     |  |        |
+  +--+  +--+  +  +  +  +  +  +--+  +  +  +--+--+
|  |           |  |     |  |     |  |     |     |
+  +--+  +--+--+  +  +--+  +--+--+  +--+--+  +  +
|     |  |        |     |           |        |  |
+--+  +  +  +--+--+--+  +--+--+--+--+--+--+--+  +
|     |  |  |        |        |           |     |
+  +--+--+  +--+--+  +--+--+  +--+  +--+  +  +  +
|        |        |        |        |     |  |  |
+  +--+  +--+--+--+  +  +--+--+--+--+  +--+  +  +
|     |              |                       |  |
+--+--+--+--+--+--+--+--+--+--+--+--+--+--+--+--+

Our aim now is to take our main.py from our earlier minecraft clone and integerate this maze code into it. We will replace the section of code that sets up the initial landscape with our maze generation code. Step one is to make a new folder called dojomaze and copy your main.py and texture.png file to it. So if we look at the main.py we are going to change our def _initialize function to insert our maze code

def _initialize(self):
    """ Initialize the world by placing all the blocks."""

    n = 21 # make the world small enough
    s = 1 # step size
    y = 0 # initial y height
    for x in xrange(-n, n + 1, s):
        for z in xrange(-n, n + 1, s):
            # create a layer stone everywhere.
            self.add_block((x, y - 3, z), STONE, immediate=False)
            if x in (-n, n) or z in (-n, n):
                # create outer walls.
                for dy in xrange(-2, 3):
                    self.add_block((x, y + dy, z), STONE, immediate=False)
    ##---now put our maze on top-------------------------------------------------------------------
    def make_maze(w = 13, h = 19):
        vis = [[0] * w + [1] for _ in range(h)] + [[1] * (w + 1)]
        ver = [["| "] * w + ['|'] for _ in range(h)] + [[]]
        hor = [["+--"] * w + ['+'] for _ in range(h + 1)]

        def walk(x, y):
            vis[y][x] = 1
            d = [(x - 1, y), (x, y + 1), (x + 1, y), (x, y - 1)]
            random.shuffle(d)
            for (xx, yy) in d:
                if vis[yy][xx]: continue
                if xx == x: hor[max(y, yy)][x] = "+ "
                if yy == y: ver[y][max(x, xx)] = " "
                walk(xx, yy)

        walk(random.randrange(w), random.randrange(h))
        for (a, b) in zip(hor, ver):
            #--build up our map line by line
            self.mazemap = self.mazemap + (''.join(a+ ['\n'] +b + ['\n']))

make_maze()

myrows = self.mazemap.split('\n')
#--start in the corner of our would
x = -20
z = -20
for i in myrows: #for each line in our map
    z +=1
    x = -20
    for j in i: #go through each position on the current line
        x +=1
        if j != " ": #if the map is not blank in this position build a wall 3 high
            position = (x, -0, z)
            self.add_block(position,GRASS, immediate=False)
            position = (x, -1, z)
            self.add_block(position,STONE, immediate=False)
            position = (x, -2, z)
            self.add_block(position,STONE, immediate=False)
 #place treasure - our texture is adjusted to have a treasure block in it
 self.treasureposition = (18, -2, 18)
 self.add_block(self.treasureposition,TREASURE, immediate=False)

I have put these changes along with the new textures in this zip file which you can download. Have a look and we can go through the code at the next session. If you run the code you should end up with something like

Untitled

The object of the game is to navigate the maze and find the treasure. The aim of this post was just to demonstrate how we could adapt the code that we had in order to end up with something new.

Python Minecraft II – Hello World

So in this post  for the Naas-Sallins Coder Dojo we are going to look at writing a program which will allow us to alter the state of the python minecraft world which we looked at in the last post. The first thing we need to do is amend the saveModule.py file in our pymc folder to allow for the two new blocks we added. If we look at lines 9 and 11 we have the following

        self.coordDictSave = { str(main.GRASS):'GRASS', str(main.SAND):'SAND', str(main.BRICK):'BRICK', str(main.STONE):'STONE' }

        self.coordDictLoad = { 'GRASS':main.GRASS, 'SAND':main.SAND, 'BRICK':main.BRICK, 'STONE':main.STONE }

we can see the structure of the save and load lines. We don’t really need to know everything the code does to guess that we can extend it to add our 2 blocks DOJO & DOJO2 so we get

        self.coordDictSave = { str(main.GRASS):'GRASS', str(main.SAND):'SAND', str(main.BRICK):'BRICK', str(main.STONE):'STONE',str(main.DOJO):'DOJO',str(main.DOJO2):'DOJO2' }

        self.coordDictLoad = { 'GRASS':main.GRASS, 'SAND':main.SAND, 'BRICK':main.BRICK, 'STONE':main.STONE, 'DOJO':main.DOJO, 'DOJO2':main.DOJO2 }

Now when we run our main.py program we can save the world by pressing F5. This creates a file called savegame.sav in our pymc folder.

This file has the following structure.

[-8, -3, 21]=>STONE
[52, -2, -39]=>GRASS
[66, -2, 19]=>GRASS

each line in the file represents the coordinates and texture of every block in our world. We can think of these numbers as the x, y and z of our world, where x is length, y is height and z is depth. Once we know the structure of our save file it gives the opportunity to write code to change the file and the world itself.

Our first step is to make a copy of the save file which we will call savegame.bak, this is so that we can start with a default state as we test our code. In our pymc folder create and edit a new file called world.py and add the following code

import shutil

shutil.copyfile('savegame.bak','savegame.sav')
world=open('savegame.sav','a')
world.close()

In this snippet we import the shutil library which allows us to perform operations on files on our computer. Our next line simply copies our default world state from our backup savegame.bak to savegame.sav . We then show how to open and close that file. The ‘a’ in the open statement says that we are going to open the file for append, which just means that we are going to add on to the end of the file.

Next we are going to alter our world by adding lines to the savegame.sav file. In this example we are going to create a large ‘hello world’ message in blocks. So we are going to create a function which will draw each letter.


def do_h(startx,starth,starty,texture):
    """ draw the letter H """
    myletter = []
    myletter.append("[%d,%d,%d]=>%s\n" % (startx,starth,starty,texture))
    myletter.append("[%d,%d,%d]=>%s\n" % (startx,starth+1,starty,texture))
    myletter.append("[%d,%d,%d]=>%s\n" % (startx,starth+2,starty,texture))
    myletter.append("[%d,%d,%d]=>%s\n" % (startx,starth+3,starty,texture))
    myletter.append("[%d,%d,%d]=>%s\n" % (startx,starth+4,starty,texture))
    myletter.append("[%d,%d,%d]=>%s\n" % (startx+1,starth+2,starty,texture))
    myletter.append("[%d,%d,%d]=>%s\n" % (startx+2,starth+2,starty,texture))
    myletter.append("[%d,%d,%d]=>%s\n" % (startx+3,starth,starty,texture))
    myletter.append("[%d,%d,%d]=>%s\n" % (startx+3,starth+1,starty,texture))
    myletter.append("[%d,%d,%d]=>%s\n" % (startx+3,starth+2,starty,texture))
    myletter.append("[%d,%d,%d]=>%s\n" % (startx+3,starth+3,starty,texture))
    myletter.append("[%d,%d,%d]=>%s\n" % (startx+3,starth+4,starty,texture))
    return(myletter)

This function is different than the ones we had in earlier posts, if we look at the first line we can see that we have some values in between the brackets after our name do_h. These values are called parameters and they represent the variables that we want this function to do its work on. In this case they are startx, starth, starty, texture which represent the beginning coordinates of the first block we want to place in our world along with the texture we want to use. After that we create a new list called myletter and then begin to create the lines which will draw our letter H. We do this by adding onto the beginning position of our first block. For example if we want to add a block on top of our first (which will be part of our first leg of the letter H) we have

startx,starth+1,starty,texture

so you can see that all we are changing  is the height of the block by one in comparison to the first. To explain the rest of the line, mylist.append simply means that we add onto our list. The next bit

("[%d,%d,%d]=>%s\n" % (startx+3,starth+4,starty,texture))

says to replace the placeholders (%d for digits and %s for words) with the following variables. Really all this is saying is that we want to create a line that will have the same structure as our savegame.sav file. In general our function creates a list of the lines we want to add to our file given a start position and texture. In order to actually add this letter H to our world we need to call the function so our code becomes

import shutil
def do_h(startx,starth,starty,texture):
    """ draw the letter H """
    myletter = []
    myletter.append("[%d,%d,%d]=>%s\n" % (startx,starth,starty,texture))
    myletter.append("[%d,%d,%d]=>%s\n" % (startx,starth+1,starty,texture))
    myletter.append("[%d,%d,%d]=>%s\n" % (startx,starth+2,starty,texture))
    myletter.append("[%d,%d,%d]=>%s\n" % (startx,starth+3,starty,texture))
    myletter.append("[%d,%d,%d]=>%s\n" % (startx,starth+4,starty,texture))
    myletter.append("[%d,%d,%d]=>%s\n" % (startx+1,starth+2,starty,texture))
    myletter.append("[%d,%d,%d]=>%s\n" % (startx+2,starth+2,starty,texture))
    myletter.append("[%d,%d,%d]=>%s\n" % (startx+3,starth,starty,texture))
    myletter.append("[%d,%d,%d]=>%s\n" % (startx+3,starth+1,starty,texture))
    myletter.append("[%d,%d,%d]=>%s\n" % (startx+3,starth+2,starty,texture))
    myletter.append("[%d,%d,%d]=>%s\n" % (startx+3,starth+3,starty,texture))
    myletter.append("[%d,%d,%d]=>%s\n" % (startx+3,starth+4,starty,texture))
    return(myletter)

shutil.copyfile('savegame.bak','savegame.sav')
world=open('savegame.sav','a')

nextletter = do_h(20,4,-8,'DOJO2')
for i in nextletter:
    world.write(i)

world.close()

Here we can see that in order to create our H we call the function do_h and send it our values for startx, starty, startz and texture. The values passed to our function when we call it need to be in the format and order that our function expects in order for it to work. By changing these values we can alter where the letter will be placed in our world.   The variable next letter takes on the value returned by our function and we then loop through that list writing the details to our world file. If we run this program we will then be able to see our floating letter when we run our world using main.py. All that is required to spell out Hello World is to define a function for each letter and then call it with the correct starting coordinates.
helloworld

Its a fair bit to take in but once you get the hang of it you can create all sorts of objects by code alone. The full Hello world code is below. Note how once we have defined the letter, we only need to change the coordinates to position it somewhere else.

import shutil

def do_e(startx,starth,starty,texture):
    """ draw the letter E """
    myletter = []
    myletter.append("[%d,%d,%d]=>%s\n" % (startx,starth,starty,texture))
    myletter.append("[%d,%d,%d]=>%s\n" % (startx,starth+1,starty,texture))
    myletter.append("[%d,%d,%d]=>%s\n" % (startx,starth+2,starty,texture))
    myletter.append("[%d,%d,%d]=>%s\n" % (startx,starth+3,starty,texture))
    myletter.append("[%d,%d,%d]=>%s\n" % (startx,starth+4,starty,texture))
    myletter.append("[%d,%d,%d]=>%s\n" % (startx+1,starth+2,starty,texture))
    myletter.append("[%d,%d,%d]=>%s\n" % (startx+2,starth+2,starty,texture))
    myletter.append("[%d,%d,%d]=>%s\n" % (startx+1,starth,starty,texture))
    myletter.append("[%d,%d,%d]=>%s\n" % (startx+2,starth,starty,texture))
    myletter.append("[%d,%d,%d]=>%s\n" % (startx+1,starth+4,starty,texture))
    myletter.append("[%d,%d,%d]=>%s\n" % (startx+2,starth+4,starty,texture))
    return(myletter)
def do_h(startx,starth,starty,texture):
    """ draw the letter H """
    myletter = []
    myletter.append("[%d,%d,%d]=>%s\n" % (startx,starth,starty,texture))
    myletter.append("[%d,%d,%d]=>%s\n" % (startx,starth+1,starty,texture))
    myletter.append("[%d,%d,%d]=>%s\n" % (startx,starth+2,starty,texture))
    myletter.append("[%d,%d,%d]=>%s\n" % (startx,starth+3,starty,texture))
    myletter.append("[%d,%d,%d]=>%s\n" % (startx,starth+4,starty,texture))
    myletter.append("[%d,%d,%d]=>%s\n" % (startx+1,starth+2,starty,texture))
    myletter.append("[%d,%d,%d]=>%s\n" % (startx+2,starth+2,starty,texture))
    myletter.append("[%d,%d,%d]=>%s\n" % (startx+3,starth,starty,texture))
    myletter.append("[%d,%d,%d]=>%s\n" % (startx+3,starth+1,starty,texture))
    myletter.append("[%d,%d,%d]=>%s\n" % (startx+3,starth+2,starty,texture))
    myletter.append("[%d,%d,%d]=>%s\n" % (startx+3,starth+3,starty,texture))
    myletter.append("[%d,%d,%d]=>%s\n" % (startx+3,starth+4,starty,texture))
    return(myletter)
def do_l(startx,starth,starty,texture):
    """ draw the letter L """
    myletter = []
    myletter.append("[%d,%d,%d]=>%s\n" % (startx,starth,starty,texture))
    myletter.append("[%d,%d,%d]=>%s\n" % (startx,starth+1,starty,texture))
    myletter.append("[%d,%d,%d]=>%s\n" % (startx,starth+2,starty,texture))
    myletter.append("[%d,%d,%d]=>%s\n" % (startx,starth+3,starty,texture))
    myletter.append("[%d,%d,%d]=>%s\n" % (startx,starth+4,starty,texture))
    myletter.append("[%d,%d,%d]=>%s\n" % (startx+1,starth,starty,texture))
    myletter.append("[%d,%d,%d]=>%s\n" % (startx+2,starth,starty,texture))
    return(myletter)
def do_o(startx,starth,starty,texture):
    """ draw the letter O """
    myletter = []
    myletter.append("[%d,%d,%d]=>%s\n" % (startx,starth,starty,texture))
    myletter.append("[%d,%d,%d]=>%s\n" % (startx,starth+1,starty,texture))
    myletter.append("[%d,%d,%d]=>%s\n" % (startx,starth+2,starty,texture))
    myletter.append("[%d,%d,%d]=>%s\n" % (startx,starth+3,starty,texture))
    myletter.append("[%d,%d,%d]=>%s\n" % (startx,starth+4,starty,texture))
    myletter.append("[%d,%d,%d]=>%s\n" % (startx+1,starth,starty,texture))
    myletter.append("[%d,%d,%d]=>%s\n" % (startx+2,starth,starty,texture))
    myletter.append("[%d,%d,%d]=>%s\n" % (startx+1,starth+4,starty,texture))
    myletter.append("[%d,%d,%d]=>%s\n" % (startx+2,starth+4,starty,texture))
    myletter.append("[%d,%d,%d]=>%s\n" % (startx+3,starth,starty,texture))
    myletter.append("[%d,%d,%d]=>%s\n" % (startx+3,starth+1,starty,texture))
    myletter.append("[%d,%d,%d]=>%s\n" % (startx+3,starth+2,starty,texture))
    myletter.append("[%d,%d,%d]=>%s\n" % (startx+3,starth+3,starty,texture))
    myletter.append("[%d,%d,%d]=>%s\n" % (startx+3,starth+4,starty,texture))
    return(myletter)
def do_w(startx,starth,starty,texture):
    """ draw the letter W """
    myletter = []
    myletter.append("[%d,%d,%d]=>%s\n" % (startx+1,starth,starty,texture))
    myletter.append("[%d,%d,%d]=>%s\n" % (startx+3,starth,starty,texture))
    myletter.append("[%d,%d,%d]=>%s\n" % (startx,starth+1,starty,texture))
    myletter.append("[%d,%d,%d]=>%s\n" % (startx+2,starth+1,starty,texture))
    myletter.append("[%d,%d,%d]=>%s\n" % (startx+4,starth+1,starty,texture))
    myletter.append("[%d,%d,%d]=>%s\n" % (startx,starth+2,starty,texture))
    myletter.append("[%d,%d,%d]=>%s\n" % (startx+2,starth+2,starty,texture))
    myletter.append("[%d,%d,%d]=>%s\n" % (startx+4,starth+2,starty,texture))
    myletter.append("[%d,%d,%d]=>%s\n" % (startx,starth+3,starty,texture))
    myletter.append("[%d,%d,%d]=>%s\n" % (startx+2,starth+3,starty,texture))
    myletter.append("[%d,%d,%d]=>%s\n" % (startx+4,starth+3,starty,texture))
    myletter.append("[%d,%d,%d]=>%s\n" % (startx,starth+4,starty,texture))
    myletter.append("[%d,%d,%d]=>%s\n" % (startx+4,starth+4,starty,texture))
    return(myletter)
def do_r(startx,starth,starty,texture):
    """ draw the letter R """
    myletter = []
    myletter.append("[%d,%d,%d]=>%s\n" % (startx,starth,starty,texture))
    myletter.append("[%d,%d,%d]=>%s\n" % (startx,starth+1,starty,texture))
    myletter.append("[%d,%d,%d]=>%s\n" % (startx,starth+2,starty,texture))
    myletter.append("[%d,%d,%d]=>%s\n" % (startx,starth+3,starty,texture))
    myletter.append("[%d,%d,%d]=>%s\n" % (startx,starth+4,starty,texture))
    myletter.append("[%d,%d,%d]=>%s\n" % (startx+1,starth+4,starty,texture))
    myletter.append("[%d,%d,%d]=>%s\n" % (startx+2,starth+4,starty,texture))
    myletter.append("[%d,%d,%d]=>%s\n" % (startx+3,starth+3,starty,texture))
    myletter.append("[%d,%d,%d]=>%s\n" % (startx+2,starth+2,starty,texture))
    myletter.append("[%d,%d,%d]=>%s\n" % (startx+1,starth+2,starty,texture))
    myletter.append("[%d,%d,%d]=>%s\n" % (startx+3,starth+1,starty,texture))
    myletter.append("[%d,%d,%d]=>%s\n" % (startx+3,starth,starty,texture))
    return(myletter)
def do_d(startx,starth,starty,texture):
    """ draw the letter O """
    myletter = []
    myletter.append("[%d,%d,%d]=>%s\n" % (startx,starth,starty,texture))
    myletter.append("[%d,%d,%d]=>%s\n" % (startx,starth+1,starty,texture))
    myletter.append("[%d,%d,%d]=>%s\n" % (startx,starth+2,starty,texture))
    myletter.append("[%d,%d,%d]=>%s\n" % (startx,starth+3,starty,texture))
    myletter.append("[%d,%d,%d]=>%s\n" % (startx,starth+4,starty,texture))
    myletter.append("[%d,%d,%d]=>%s\n" % (startx+1,starth,starty,texture))
    myletter.append("[%d,%d,%d]=>%s\n" % (startx+2,starth,starty,texture))
    myletter.append("[%d,%d,%d]=>%s\n" % (startx+1,starth+4,starty,texture))
    myletter.append("[%d,%d,%d]=>%s\n" % (startx+2,starth+4,starty,texture))
    #myletter.append("[%d,%d,%d]=>%s\n" % (startx+3,starth,starty,texture))
    myletter.append("[%d,%d,%d]=>%s\n" % (startx+3,starth+1,starty,texture))
    myletter.append("[%d,%d,%d]=>%s\n" % (startx+3,starth+2,starty,texture))
    myletter.append("[%d,%d,%d]=>%s\n" % (startx+3,starth+3,starty,texture))
    return(myletter)

shutil.copyfile('savegame.bak','savegame.sav')
world=open('savegame.sav','a')

nextletter = do_h(20,4,-8,'DOJO2')
for i in nextletter:
    world.write(i)
nextletter = do_e(25,4,-8,'DOJO2')
for i in nextletter:
    world.write(i)
nextletter = do_l(29,4,-8,'DOJO2')
for i in nextletter:
    world.write(i)
nextletter = do_l(33,4,-8,'DOJO2')
for i in nextletter:
    world.write(i)
nextletter = do_o(37,4,-8,'DOJO2')
for i in nextletter:
    world.write(i)
nextletter = do_w(43,4,-8,'DOJO2')
for i in nextletter:
    world.write(i)
nextletter = do_o(49,4,-8,'DOJO2')
for i in nextletter:
    world.write(i)
nextletter = do_r(54,4,-8,'DOJO2')
for i in nextletter:
    world.write(i)
nextletter = do_l(59,4,-8,'DOJO2')
for i in nextletter:
    world.write(i)
nextletter = do_d(63,4,-8,'DOJO2')
for i in nextletter:
    world.write(i)
world.close()


Simple Python Minecraft Clone

This is the latest in a series for the Naas-Sallins Coder Dojo about using the Python programming language. This time we are going to look at taking the source code for a simple Python minecraft clone by Michael Fogleman and making some amendments.

Our First step is getting the pyglet graphic library installed. Michael has some instructions on his page but in general on the command line type [to get to the command line on windows press the windows key and r and then type cmd before pressing enter]

pip install pyglet

This will download and install the library for you, if you run into trouble try these tips or wait until the next dojo session and I will try to help out.

Once you have pyglet installed the next step is to get the python code we are going to play with. We are going to use a fork of the original project by another github user (bison) which contains some code to save the state of the world and then reload it. So download this zip file and extract its contents to a new folder, call that folder something like pymc. Our folder should contain the following files

LICENSE
main.py
README.md
saveModule.py
texture.png

So step one is to check that everything works by running main.py. You can do this from the command line by changing to your pymc folder and typing python main.py or by loading the file into the pythonwin editor and clicking run. If you get something like

basicworld

then congrats, everything is working as it should! Play instructions are below.

 Moving

– W: forward
– S: back
– A: strafe left
– D: strafe right
– Mouse: look around
– Space: jump
– Tab: toggle flying mode

Building

– Selecting type of block to create:
– 1: brick
– 2: grass
– 3: sand
– Mouse left-click: remove block
– Mouse right-click: create block

Quitting

– ESC: release mouse, then close window

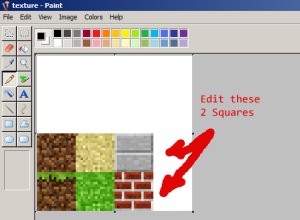
Okay so next we are going to learn how to add our own blocks which involves firstly editing the image file texture.png and then editing the main.py file to allow for the new blocks that we are going to add. To start copy texture.png to a new file called texture2.png then open this in an image editor like mspaint. You should see

textureblank

we are going to edit the two squares shown. For example with mspaint I changed them to

textureedit

which is the coderdojo logo and a badly hand drawn one! Don’t worry you can come back to this as often as you like.

So now we need to edit the main.py code to allow for these new blocks. Open the file in your editor and have a quick look at it.  Don’t panic! We have 845 lines of code but we only need to change a few of them.

Lets start by telling the program to use our new texture2.png. In your editor search for texture.png (ctrl+f in pythonwin), it is on line 55. Change this to read

TEXTURE_PATH = 'texture2.png'

Just below that we have 4 lines which tell the program which section of texture2.png to use for the top bottom and side of each block. Our 2 blocks will use the same texture for all sides so lets add our two lines for these blocks which I’m calling DOJO and DOJO2

GRASS = tex_coords((1, 0), (0, 1), (0, 0))
SAND = tex_coords((1, 1), (1, 1), (1, 1))
BRICK = tex_coords((2, 0), (2, 0), (2, 0))
STONE = tex_coords((2, 1), (2, 1), (2, 1))
DOJO = tex_coords((3, 1), (3, 1), (3, 1))
DOJO2 = tex_coords((3, 0), (3, 0), (3, 0))

In order to be able to place these blocks we need to add them to the inventory of blocks so that when a player presses 4 or 5 it changes the block to place to DOJO or DOJO2. If we have a look through our code or search for inventory we find on line 455

        # A list of blocks the player can place. Hit num keys to cycle.
        self.inventory = [BRICK, GRASS, SAND]

Here we can see a comment telling what the code does and then our list of textures. Lets edit this to

        # A list of blocks the player can place. Hit num keys to cycle.
        self.inventory = [BRICK, GRASS, SAND, DOJO, DOJO2]

If we run this new main.py we should be able to place our new blocks by pressing 4 or 5
newblockworld